
By default, a certificate that is submitted to, and issued by, a Windows Certificate Authority (CA) cannot be exported with its private key. A customer was recently executing a project that involved introducing IBM Cloud with Morpheus and the people doing the integration asked us for a certificate. We naturally complied and gave them the CER file based on the certificate request that they had generated. That didn’t go down well. They apparently need the CRT and the KEY files for the application. That set us in motion trying to rack our brains on what we needed to do to make that happen.
We quickly (re) learned how to do it and we noted quite how many places on the Internet parts of the information is, but we couldn’t find anywhere with recent imagery and narrative on how to pull everything together. So here we go!
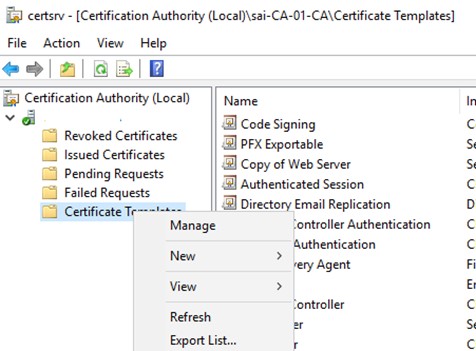
A New Template In The CA.
On your certificate server, open the Certificate Service Manager, but not the local user/computer certificate manager. Proceed to Certificate Templates and right click.
Select Manage.
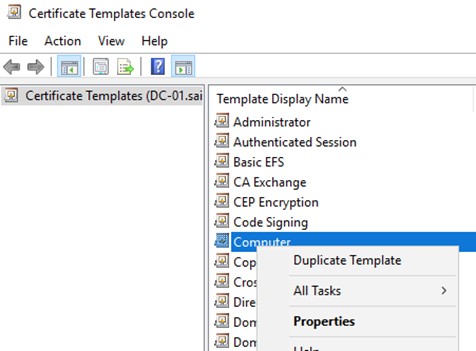
Right click on the Computer template and select Duplicate.
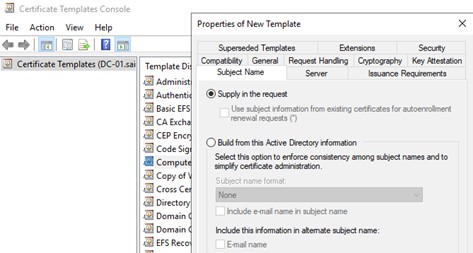
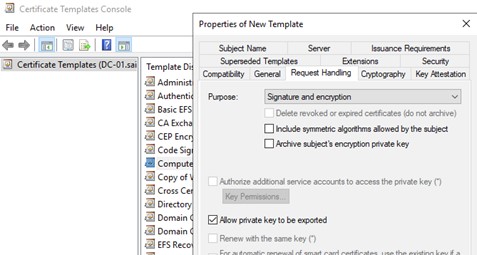
Then make the following changes.
Give the certificate template a recognizable name.
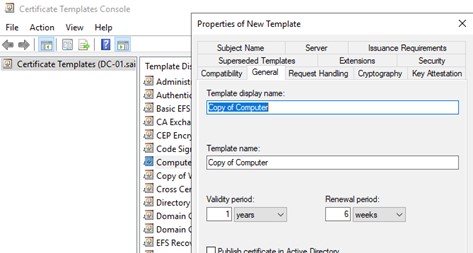
In our case it was necessary to deselect the Build from AD Information since the consultants had their own details in mind. You might have a case where you might want to retain that feature. To do tht just make two duplicates.
And finally, the most important part was to select to allow the private key to be exported.
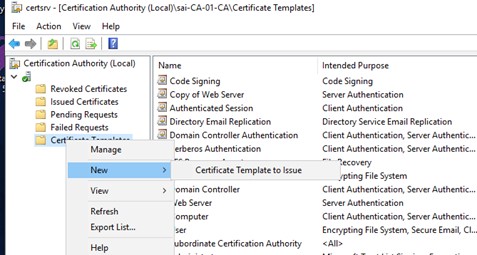
Save your new template and right click the Certificate Templates once more, this time selecting New, and Certificate Template to Issue. Find your new template and select OK.
That’s it for your certificate template. Now it’s time to go and request certificate itself.
Generating the Certificate
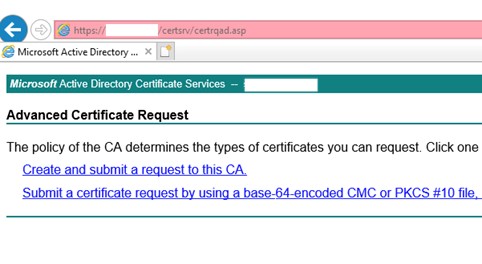
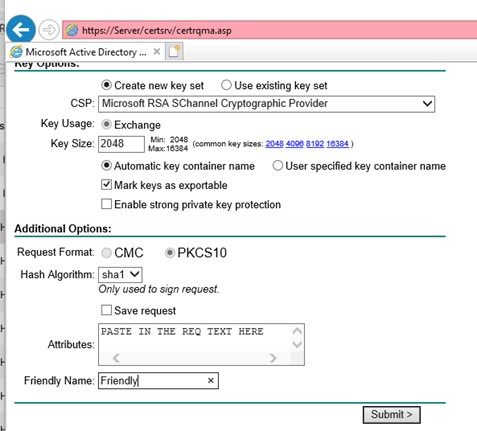
Go to your certificate server URL https://server.domain.com/certsrv/certreqma.asp. That gets you straight to the Advanced request page.
Select Create and submit.
Make your certificate here. In the first image you select the template that you just duplicated and saved.
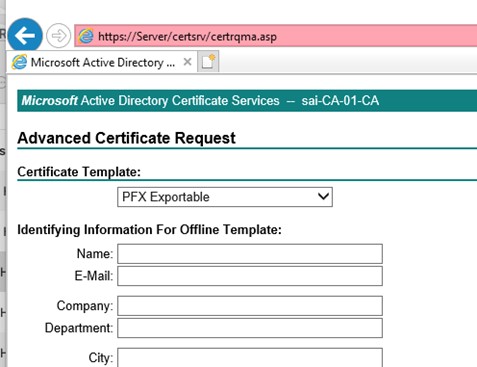
The second image is where the magic happens.
Tick the box to make the key exportable and then paste in the certificate request text. Then just hit Submit.
That will bring up a new page that gives you the option to click Install This Certificate.
The certificate itself will be installed into the local users (not computers) certificate store.
From there you can select to export the key issued by the Windows CA and you will now be given the option to export the private key which will make a PFX rather than a CER file. You will also be given a box in which to type a password. Do that and remember what you typed.
So that’s you then, done. Well maybe not so much. The consultants we were dealing with didn’t know how to make the CRT and KEY that they wanted, so we had to do it for them.
Generating the CRT and KEY Files
Armed with your PFX file you may now use OpenSSL to do the exports.
From an elevated command line run the following instruction:
For the KEY file
Openssl pkcs12 -in “path to pfx file” -nocerts -out “path to desired destination.key”
You will be prompted for the password you entered when you exported the certificate to the PFX file.
For the CRT file
Openssl pkcs12 -in “path to pfx file” -nokeys -out “path to desired destination.crt”
Summary
This is probably a niche request but an important one as cloud services, integrated operations and automation get ever more entrenched. There wasn’t a single place to go to get the steps to get a Windows CA based certificate capable of being exported with the private key and then using OpenSSL to get the necessary date out if it.
And of course, if you don’t want to do this yourself, you know who you can call! Verinext will be glad to help!


